
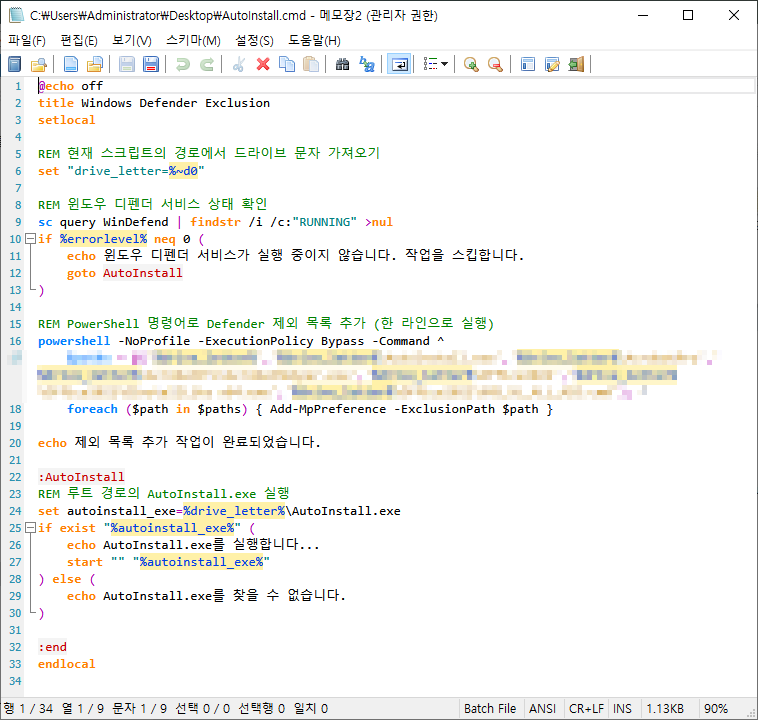
소프트웨어 선택 자동설치를 무인설치 응답파일(unattend.xml) oobeSystem - FirstLogonCommands 구간에 RunOnce 명령을 추가 하여 설치 과정을 녹화해 보았습니다. reg add HKCU\Software\Microsoft\Windows\CurrentVersion\RunOnce /v FirstLogin /t REG_SZ /d 참고 하여 활용해 보시기 바랍니다.

https://learn.microsoft.com/ko-kr/windows/win32/setupapi/run-and-runonce-registry-keys
RunOnce 레지스트리 키 실행 및 실행 - Win32 apps
실행 또는 RunOnce 레지스트리 키를 사용하여 사용자가 로그온할 때 프로그램을 실행합니다.
learn.microsoft.com
RunOnce 레지스트리 키 실행 및 실행
또는 RunOnce 레지스트리 키를 사용하여 Run 사용자가 로그온할 때 프로그램을 실행합니다. 키는 Run 사용자가 로그온할 때마다 프로그램을 실행하게 하고, RunOnce 키는 프로그램을 한 번 실행한 다음 키가 삭제됩니다. 이러한 키는 사용자 또는 컴퓨터에 대해 설정할 수 있습니다.
키의 데이터 값은 260자 이하의 명령줄입니다. 양식 설명-문자열=명령줄의 항목을 추가하여 실행할 프로그램을 등록합니다. 키 아래에 여러 항목을 쓸 수 있습니다. 특정 키로 둘 이상의 프로그램이 등록된 경우 해당 프로그램이 실행되는 순서는 확정되지 않습니다.
Windows 레지스트리에는 다음 4개의 Run 키와 RunOnce 키가 포함됩니다.
개별 사용자 지속용 : HKEY_CURRENT_USER\Software\Microsoft\Windows\CurrentVersion\Run
개별 사용자 일회용 : HKEY_CURRENT_USER\Software\Microsoft\Windows\CurrentVersion\RunOnce
전체 사용자 지속용 : HKEY_LOCAL_MACHINE\Software\Microsoft\Windows\CurrentVersion\Run
전체 사용자 일회용 : HKEY_LOCAL_MACHINE\Software\Microsoft\Windows\CurrentVersion\RunOnce
<?xml version="1.0" encoding="utf-8"?>
<unattend xmlns="urn:schemas-microsoft-com:unattend">
    <settings pass="windowsPE">
    </settings>
    <settings pass="specialize">
        <component name="Microsoft-Windows-Deployment" processorArchitecture="amd64" publicKeyToken="31bf3856ad364e35" language="neutral" versionScope="nonSxS" xmlns:wcm="http://schemas.microsoft.com/WMIConfig/2002/State" xmlns:xsi="http://www.w3.org/2001/XMLSchema-instance">
	<RunSynchronous>
	<!-- x64 WanDrv7 런처(EDLauncher.bat 배치 파일이 있으면 실행하고 없으면 종료) -->
		<RunSynchronousCommand wcm:action="add">
			<Order>1</Order>
			<Path>cmd.exe /c if exist "%Windir%\Setup\Scripts\EDLauncher.bat" "%Windir%\Setup\Scripts\EDLauncher.bat"</Path>
			<Description>Auto Driver Launcher</Description>
		</RunSynchronousCommand>
	</RunSynchronous>
	</component>
    </settings>
    <settings pass="oobeSystem">
        <component name="Microsoft-Windows-Shell-Setup" processorArchitecture="amd64" publicKeyToken="31bf3856ad364e35" language="neutral" versionScope="nonSxS" xmlns:wcm="http://schemas.microsoft.com/WMIConfig/2002/State" xmlns:xsi="http://www.w3.org/2001/XMLSchema-instance">
	<!-- OOBE 무인 설정(자동화) -->
	<OOBE>
		<!-- Windows 시작의 Microsoft 소프트웨어 사용 조건 페이지를 숨길지 여부를 지정합니다. -->
		<HideEULAPage>true</HideEULAPage>
		<!-- Windows 시작 중에 나타나는 무선 네트워크 연결 화면을 숨길지 여부를 지정합니다. -->
		<HideWirelessSetupInOOBE>true</HideWirelessSetupInOOBE>
		<!-- 사용자가 처음 로그온할 때 컴퓨터가 네트워크에 연결된 경우 네트워크의 위치를 지정합니다. -->
		<NetworkLocation>Work</NetworkLocation>
		<!-- 중요하고 권장되는 업데이트가 자동으로 설치되도록 지정합니다. -->
		<ProtectYourPC>3</ProtectYourPC>
		<SkipMachineOOBE>true</SkipMachineOOBE>
		<SkipUserOOBE>true</SkipUserOOBE>
	</OOBE>
	<!-- 관리자(Administrator) 계정으로 자동 로그인 -->
	<AutoLogon>
		<Enabled>true</Enabled>
		<LogonCount>1</LogonCount>
		<Username>Administrator</Username>
	</AutoLogon>
	<!-- 사용자가 컴퓨터에 처음으로 로그온할 때 실행할 명령을 지정합니다. -->
	<FirstLogonCommands>
	<!-- RunOnce 바탕화면 진입 시 1회 실행 할 항목 등록, ex) 아래 경로에 AutoInstall.cmd 파일이 있으면 등록 없으면 패스 -->
		<SynchronousCommand wcm:action="add">
			<Order>1</Order>
			<CommandLine>cmd.exe /c if exist "C:\AutoInstall\AutoInstall.cmd" reg add HKCU\Software\Microsoft\Windows\CurrentVersion\RunOnce /v FirstLogin /t REG_SZ /d "C:\AutoInstall\AutoInstall.cmd" /f</CommandLine>
			<Description>Run AutoInstall.cmd Script if Exists</Description>
		</SynchronousCommand>
	</FirstLogonCommands>
	<!-- 해상도 설정 -->
	<Display>
		<HorizontalResolution>1024</HorizontalResolution>
		<VerticalResolution>768</VerticalResolution>
		<ColorDepth>32</ColorDepth>
	</Display>
	</component>
    </settings>
    <cpi:offlineImage cpi:source="" xmlns:cpi="urn:schemas-microsoft-com:cpi" />
</unattend>

소프트웨어 선택 자동 설치 v4.0 무인설치 연동 - 움짤 GIF
■ 동영상 제목 클릭 후 전체화면(1080P)시청 가능합니다.
정보가 도움이 되었다면 아래 링크로 커피를 후원 해주세요. ^^

'자작 프로그램 > SW AutoInstall' 카테고리의 다른 글
| 필수 S/W 다운로드 도구 샘플 테스트 중 . . . (2) | 2024.12.22 |
|---|---|
| AutoInstall v3.0 (소프트웨어 자동 설치 샘플) (0) | 2024.12.15 |
| AutoInstall v2.5 (소프트웨어 자동 설치 샘플) (3) | 2024.11.22 |
| AutoInstall v2.0 (소프트웨어 자동 설치 샘플) (10) | 2024.11.19 |
| AutoInstall v1.0 (소프트웨어 자동 설치 샘플) (3) | 2024.11.17 |


