반응형

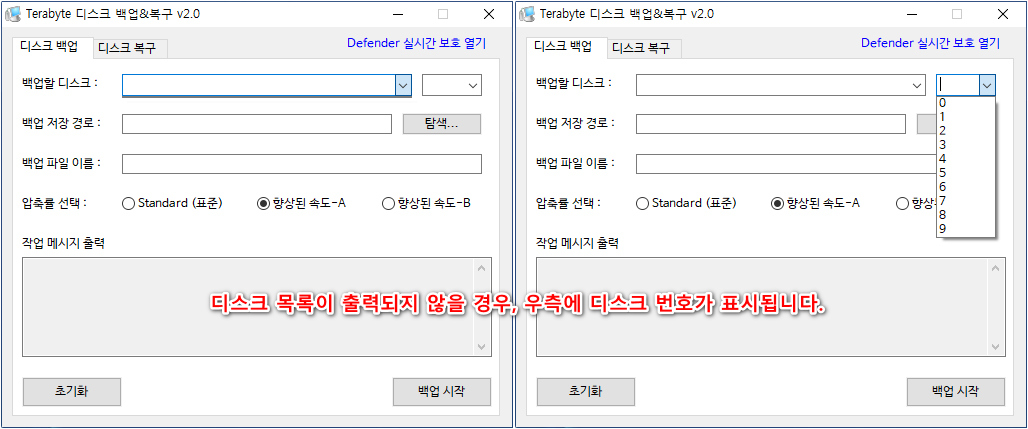
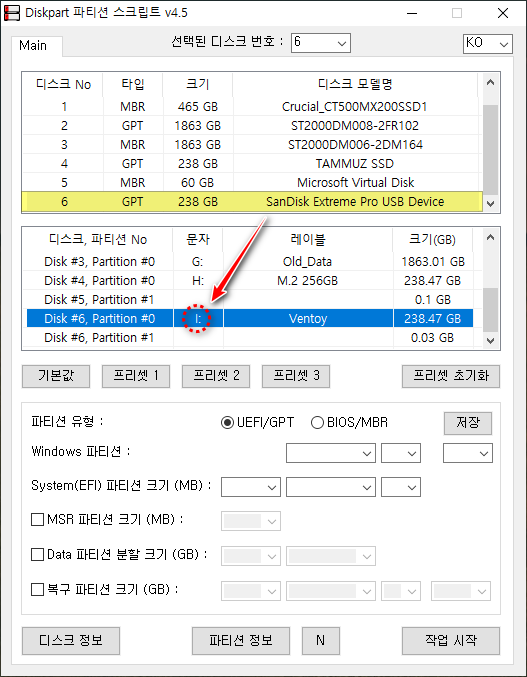
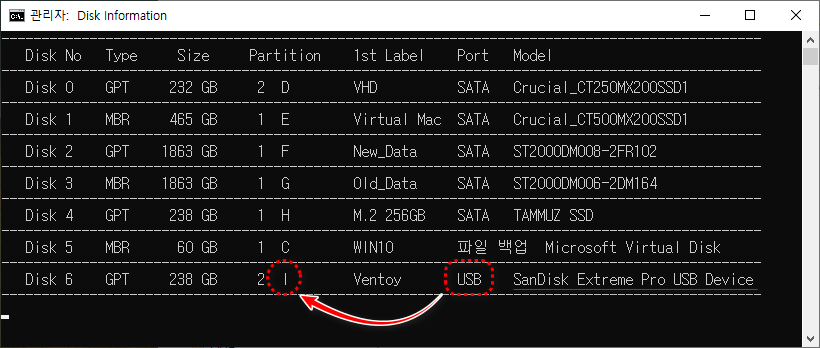
자동 탭에서 일부 USB 드라이브가 정상적으로 검색되지 않는 문제가 제보되어, 오토잇 스크립트 구문을 개선하였습니다.

Choose Installation File v3.5.zip
1.69MB


https://noways.tistory.com/2071


윈도우 설치 파일 선택기 v3.0 - 기능 통합(완료)

윈도우 설치 파일 선택기 v3.0  - v1.0과 v2.0의 기능을 통합하고, 탭으로 분리하여 v3.0으로 개선하였습니다.  - v2.0에서 지원하지 않았던 ESD 확장자를 v3.0에서 지원하도록 개선하였

noways.tistory.com


Func SearchFiles()
    ; ListView 초기화 (기존 항목 삭제)
    GUICtrlDelete($listview)
    $listview = GUICtrlCreateListView("File Path|Size (GB)", 20, 120, 620, 240, $LVS_REPORT)
    GUICtrlSendMsg($listview, 4126, 0, 520) ; Set width for 'File Path'
    GUICtrlSendMsg($listview, 4126, 1, 70) ; Set width for 'Size (GB)'
    
    Local $iDepth = Number(GUICtrlRead($spnDepth))
    If $iDepth < 0 Then $iDepth = 0

    ; 고정 드라이브 검색 (HDD, SSD)
    Local $aDrives = DriveGetDrive("FIXED")
    If Not @error Then
        For $i = 1 To $aDrives[0]
            ScanDirectories($aDrives[$i], $iDepth)
        Next
    EndIf

    ; USB 드라이브 검색 (REMOVABLE)
    Local $aUsbDrives = DriveGetDrive("REMOVABLE")
    If Not @error Then
        For $i = 1 To $aUsbDrives[0]
            ScanDirectories($aUsbDrives[$i], $iDepth)
        Next
    EndIf

    ; CD-ROM 드라이브 검색
    Local $aCdDrives = DriveGetDrive("CDROM")
    If Not @error Then
        For $i = 1 To $aCdDrives[0]
            ScanDirectories($aCdDrives[$i], $iDepth)
        Next
    EndIf
EndFunc

Func ScanDirectories($sPath, $iDepth, $iCurrentDepth = 0)
    If $iCurrentDepth > $iDepth Then Return

    If StringRight($sPath, 1) <> "\" Then $sPath &= "\"

    Local $aExtensions = ["*.iso", "*.wim", "*.esd"]
    For $ext In $aExtensions
        Local $aFiles = _FileListToArray($sPath, $ext, $FLTA_FILES)
        If Not @error Then
            For $i = 1 To $aFiles[0]
                Local $sFilePath = $sPath & $aFiles[$i]
                Local $iFileSize = FileGetSize($sFilePath) / (1024 * 1024 * 1024)
                GUICtrlCreateListViewItem($sFilePath & "|" & Round($iFileSize, 2), $listview)
            Next
        EndIf
    Next

    If $iCurrentDepth < $iDepth Then
        Local $aDirs = _FileListToArray($sPath, "*", $FLTA_FOLDERS)
        If Not @error Then
            For $i = 1 To $aDirs[0]
                If $aDirs[$i] <> "." And $aDirs[$i] <> ".." Then
                    ScanDirectories($sPath & $aDirs[$i], $iDepth, $iCurrentDepth + 1)
                EndIf
            Next
        EndIf
    EndIf
EndFunc


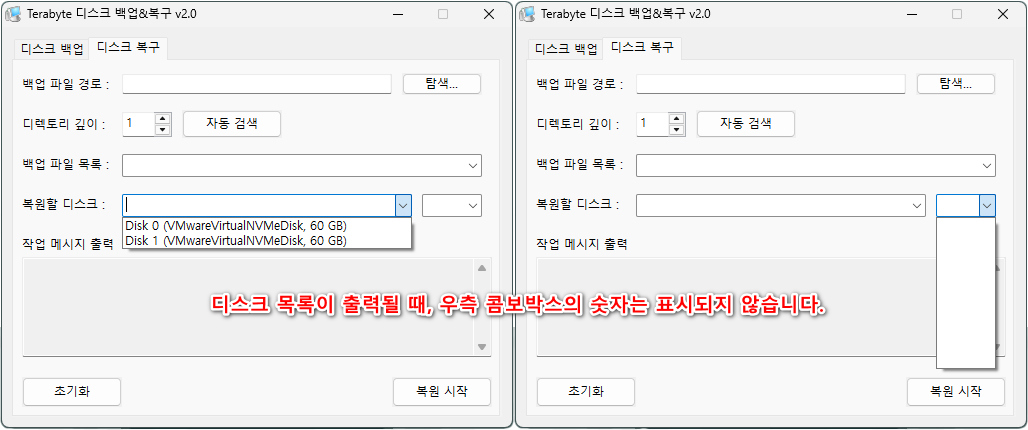
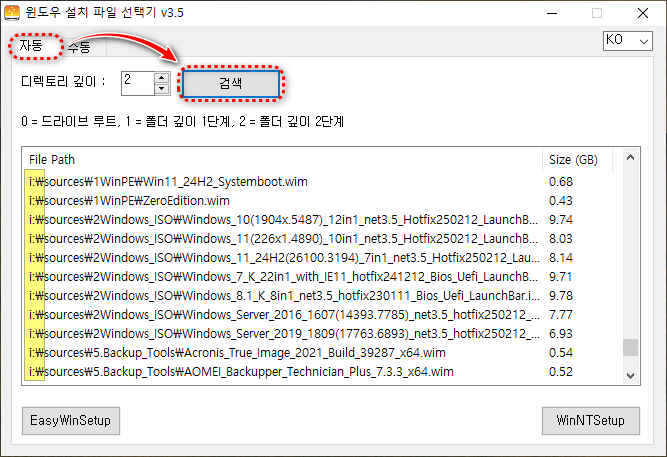
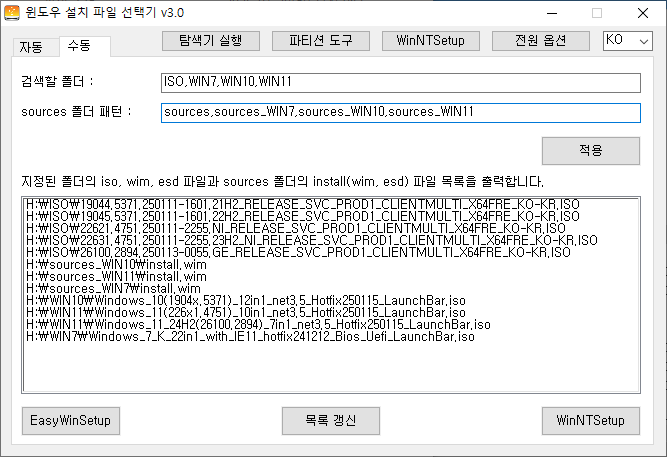
개선된 스크립트를 적용한 후, USB 드라이브 검색 목록이 정상적으로 출력되는 것을 확인하였습니다.


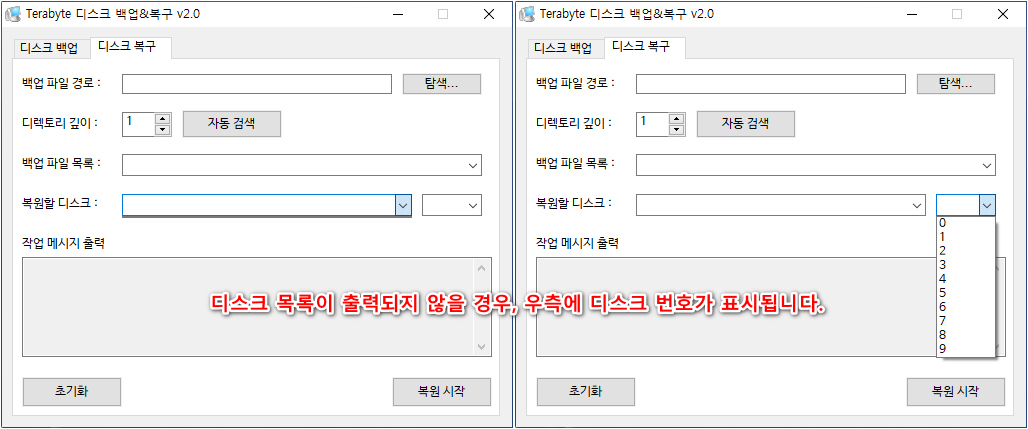
수동 탭 검색의 경우 드라이브 루트 경로의 1단계 폴더만 검색하는 방식이므로 기존과 동일하게 정상 동작합니다.

└▶ 드라이브 루트 경로의 지정된(검색할 폴더) 폴더 깊이 1단계만 검색 합니다.


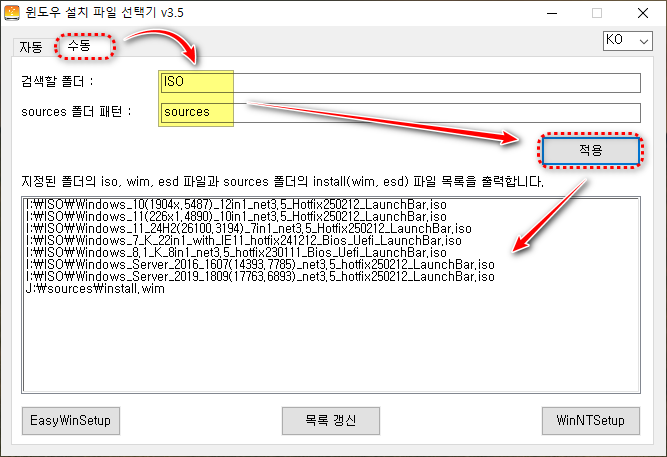
└▶ 아래와 같은 패턴으로 사용 가능 합니다.


■ 동영상 제목 클릭 후 전체화면(1080P)시청 가능합니다.


정보가 도움이 되었다면 아래 링크로 커피를 후원 해주세요. ^^

donaricano-btn

반응형
반응형

소프트웨어 선택 자동설치를 무인설치 응답파일(unattend.xml) oobeSystem - FirstLogonCommands 구간에 RunOnce 명령을 추가 하여 설치 과정을 녹화해 보았습니다. reg add HKCU\Software\Microsoft\Windows\CurrentVersion\RunOnce /v FirstLogin /t REG_SZ /d 참고 하여 활용해 보시기 바랍니다.


AutoInstall v4.0.zip
1.31MB


https://learn.microsoft.com/ko-kr/windows/win32/setupapi/run-and-runonce-registry-keys


RunOnce 레지스트리 키 실행 및 실행 - Win32 apps

실행 또는 RunOnce 레지스트리 키를 사용하여 사용자가 로그온할 때 프로그램을 실행합니다.

learn.microsoft.com


RunOnce 레지스트리 키 실행 및 실행
또는 RunOnce 레지스트리 키를 사용하여 Run 사용자가 로그온할 때 프로그램을 실행합니다. 키는 Run 사용자가 로그온할 때마다 프로그램을 실행하게 하고, RunOnce 키는 프로그램을 한 번 실행한 다음 키가 삭제됩니다. 이러한 키는 사용자 또는 컴퓨터에 대해 설정할 수 있습니다.

키의 데이터 값은 260자 이하의 명령줄입니다. 양식 설명-문자열=명령줄의 항목을 추가하여 실행할 프로그램을 등록합니다. 키 아래에 여러 항목을 쓸 수 있습니다. 특정 키로 둘 이상의 프로그램이 등록된 경우 해당 프로그램이 실행되는 순서는 확정되지 않습니다.

Windows 레지스트리에는 다음 4개의 Run 키와 RunOnce 키가 포함됩니다.

개별 사용자 지속용 : HKEY_CURRENT_USER\Software\Microsoft\Windows\CurrentVersion\Run 
개별 사용자 일회용 : HKEY_CURRENT_USER\Software\Microsoft\Windows\CurrentVersion\RunOnce
전체 사용자 지속용 : HKEY_LOCAL_MACHINE\Software\Microsoft\Windows\CurrentVersion\Run
전체 사용자 일회용 : HKEY_LOCAL_MACHINE\Software\Microsoft\Windows\CurrentVersion\RunOnce


<?xml version="1.0" encoding="utf-8"?>
<unattend xmlns="urn:schemas-microsoft-com:unattend">
    <settings pass="windowsPE">
    </settings>
    <settings pass="specialize">
        <component name="Microsoft-Windows-Deployment" processorArchitecture="amd64" publicKeyToken="31bf3856ad364e35" language="neutral" versionScope="nonSxS" xmlns:wcm="http://schemas.microsoft.com/WMIConfig/2002/State" xmlns:xsi="http://www.w3.org/2001/XMLSchema-instance">
	<RunSynchronous>
	<!-- x64 WanDrv7 런처(EDLauncher.bat 배치 파일이 있으면 실행하고 없으면 종료) -->
		<RunSynchronousCommand wcm:action="add">
			<Order>1</Order>
			<Path>cmd.exe /c if exist "%Windir%\Setup\Scripts\EDLauncher.bat" "%Windir%\Setup\Scripts\EDLauncher.bat"</Path>
			<Description>Auto Driver Launcher</Description>
		</RunSynchronousCommand>
	</RunSynchronous>
	</component>
    </settings>
    <settings pass="oobeSystem">
        <component name="Microsoft-Windows-Shell-Setup" processorArchitecture="amd64" publicKeyToken="31bf3856ad364e35" language="neutral" versionScope="nonSxS" xmlns:wcm="http://schemas.microsoft.com/WMIConfig/2002/State" xmlns:xsi="http://www.w3.org/2001/XMLSchema-instance">
	<!-- OOBE 무인 설정(자동화) -->
	<OOBE>
		<!-- Windows 시작의 Microsoft 소프트웨어 사용 조건 페이지를 숨길지 여부를 지정합니다. -->
		<HideEULAPage>true</HideEULAPage>
		<!-- Windows 시작 중에 나타나는 무선 네트워크 연결 화면을 숨길지 여부를 지정합니다. -->
		<HideWirelessSetupInOOBE>true</HideWirelessSetupInOOBE>
		<!-- 사용자가 처음 로그온할 때 컴퓨터가 네트워크에 연결된 경우 네트워크의 위치를 지정합니다. -->
		<NetworkLocation>Work</NetworkLocation>
		<!-- 중요하고 권장되는 업데이트가 자동으로 설치되도록 지정합니다. -->
		<ProtectYourPC>3</ProtectYourPC>
		<SkipMachineOOBE>true</SkipMachineOOBE>
		<SkipUserOOBE>true</SkipUserOOBE>
	</OOBE>
	<!-- 관리자(Administrator) 계정으로 자동 로그인 -->
	<AutoLogon>
		<Enabled>true</Enabled>
		<LogonCount>1</LogonCount>
		<Username>Administrator</Username>
	</AutoLogon>
	<!-- 사용자가 컴퓨터에 처음으로 로그온할 때 실행할 명령을 지정합니다. -->
	<FirstLogonCommands>
	<!-- RunOnce 바탕화면 진입 시 1회 실행 할 항목 등록, ex) 아래 경로에 AutoInstall.cmd 파일이 있으면 등록 없으면 패스 -->
		<SynchronousCommand wcm:action="add">
			<Order>1</Order>			
			<CommandLine>cmd.exe /c if exist "C:\AutoInstall\AutoInstall.cmd" reg add HKCU\Software\Microsoft\Windows\CurrentVersion\RunOnce /v FirstLogin /t REG_SZ /d "C:\AutoInstall\AutoInstall.cmd" /f</CommandLine>
			<Description>Run AutoInstall.cmd Script if Exists</Description>
		</SynchronousCommand>
	</FirstLogonCommands>
	<!-- 해상도 설정 -->
	<Display>
		<HorizontalResolution>1024</HorizontalResolution>
		<VerticalResolution>768</VerticalResolution>
		<ColorDepth>32</ColorDepth>
	</Display>
	</component>
    </settings>
    <cpi:offlineImage cpi:source="" xmlns:cpi="urn:schemas-microsoft-com:cpi" />
</unattend>


소프트웨어 선택 자동 설치 v4.0 무인설치 연동 - 움짤 GIF


■ 동영상 제목 클릭 후 전체화면(1080P)시청 가능합니다.


정보가 도움이 되었다면 아래 링크로 커피를 후원 해주세요. ^^

donaricano-btn

반응형
반응형
  • 윈도우 설치 파일 선택기 v3.0
     - v1.0과 v2.0의 기능을 통합하고, 탭으로 분리하여 v3.0으로 개선하였습니다.
     - v2.0에서 지원하지 않았던 ESD 확장자를 v3.0에서 지원하도록 개선하였습니다.
     - 언어(KO/EN) 콤보박스 동기화 기능을 추가하였습니다.

    Tools 폴더를 X 드라이브의 루트 경로에 그대로 두고 사용하는 것을 권장합니다.
     └▶ PE 탑재 드라이브의 루트 경로

    윈도우 설치 파일 선택기는 자동/수동 탭에서 선택한 파일 경로 인수를 배치 파일에 전달하는 기능을 수행하므로, 다른 배치 파일과 연동하여 사용할 수 있습니다.
     └▶ 각 배치 파일의 이름은 유지하되, 내용을 교체하여 사용할 수 있습니다.

    개별 배포에서는 상단 바로가기 실행 버튼 4개를 제외하였습니다.
     └▶ 탐색기 실행, 파티션 도구, WinNTSetup, 전원 옵션 버튼 제외

Choose_Installation_File_v3.0.zip
7.51MB


https://noways.tistory.com/2050


[KO/EN] 윈도우 설치 파일 선택기 v2.0 - 최종 버전

디렉토리 깊이에 따른 자동 검색 기능으로 개선되었습니다.고정 드라이브를 탐색한 후, 광학 드라이브에서 *.iso 및 *.wim 파일을 순차적으로 탐색합니다.검색 범위는 설정된 디렉토

noways.tistory.com


https://noways.tistory.com/2045


윈도우 설치 파일 선택기 v1.0

윈도우 설치 파일 선택기 v1.0 - 기능 개선첨부된 소스 파일과 유튜브 영상을 참고하여 응용해 보세요. 윈도우 설치 파일 선택기 Part-n-EWS-3b 연동 초안https://noways.tistory.com/2044 윈도우

noways.tistory.com


윈도우 설치 파일 선택기 v3.0(기능 통합) - 움짤 GIF


런처바(LaunchBar) 윈도우 설치 파일 선택기 v3.0 - 연동 테스트 움짤 GIF


■ 동영상 제목 클릭 후 전체화면(1080P)시청 가능합니다.


정보가 도움이 되었다면 아래 링크로 커피를 후원 해주세요. ^^

donaricano-btn

반응형
반응형

과도하게 변경된 PE 환경에서 디스크 목록이 표시되지 않는 문제를 해결하기 위해, 우측 콤보박스를 통해 디스크 번호를 직접 선택하여 백업 및 복원 작업을 수행할 수 있도록 기능을 개선하였습니다.
To address the issue where the disk list does not appear in an excessively modified PE environment, the functionality has been enhanced to allow users to select the disk number directly using the right-side combo box for backup and restore operations.


Terabyte 디스크 백업&복구 v1.5 - 기능 개선
https://noways.tistory.com/2049


Terabyte 디스크 백업&복구 v1.5 - 기능 개선

Terabyte 디스크 백업&복구 v1.0 초안 https://noways.tistory.com/2046 Terabyte 디스크 백업&복구 v1.0 초안Terabyte 디스크 백업&복구 v1.0 초안 ■ Image for Windows User Manual : https://www.terabyteunlimited.com/downloads/ifw_

noways.tistory.com


디스크 목록이 출력될 때는 우측 콤보박스의 숫자가 표시되지 않습니다.
When the disk list is displayed, the numbers in the right-side combo box are not shown.


A.Terabyte 디스크 백업&복구 v2.0 - 백업 움짤

 백업 파일 이름을 지정할 수 있으며, 지정할 경우 이름-날짜-시간 형식으로 자동 생성됩니다. 이름을 입력하지 않을 경우 backup-날짜-시간 형식으로 자동 입력됩니다.
 You can specify a name for the backup file. If specified, the name will be automatically generated in the format "name-date-time." If no name is provided, it will default to "backup-date-time."


디스크 목록이 출력될 때는 우측 콤보박스의 숫자가 표시되지 않습니다.
When the disk list is displayed, the numbers in the right-side combo box are not shown.


A.Terabyte 디스크 백업&복구 v2.0 - 복구 움짤


디스크 목록이 출력되지 않을 경우, 우측에 디스크 번호가 표시됩니다.
If the disk list is not displayed, the disk numbers are shown on the right side.


B.Terabyte 디스크 백업&복구 v2.0 - 백업 움짤

 백업 파일 이름을 지정할 수 있으며, 지정할 경우 이름-날짜-시간 형식으로 자동 생성됩니다. 이름을 입력하지 않을 경우 backup-날짜-시간 형식으로 자동 입력됩니다.
 You can specify a name for the backup file. If specified, the name will be automatically generated in the format "name-date-time." If no name is provided, it will default to "backup-date-time."


디스크 목록이 출력되지 않을 경우, 우측에 디스크 번호가 표시됩니다.
If the disk list is not displayed, the disk numbers are shown on the right side.


B.Terabyte 디스크 백업&복구 v2.0 - 복구 움짤


■ 동영상 제목 클릭 후 전체화면(1080P)시청 가능합니다.


정보가 도움이 되었다면 아래 링크로 커피를 후원 해주세요. ^^

donaricano-btn

반응형

+ Recent posts